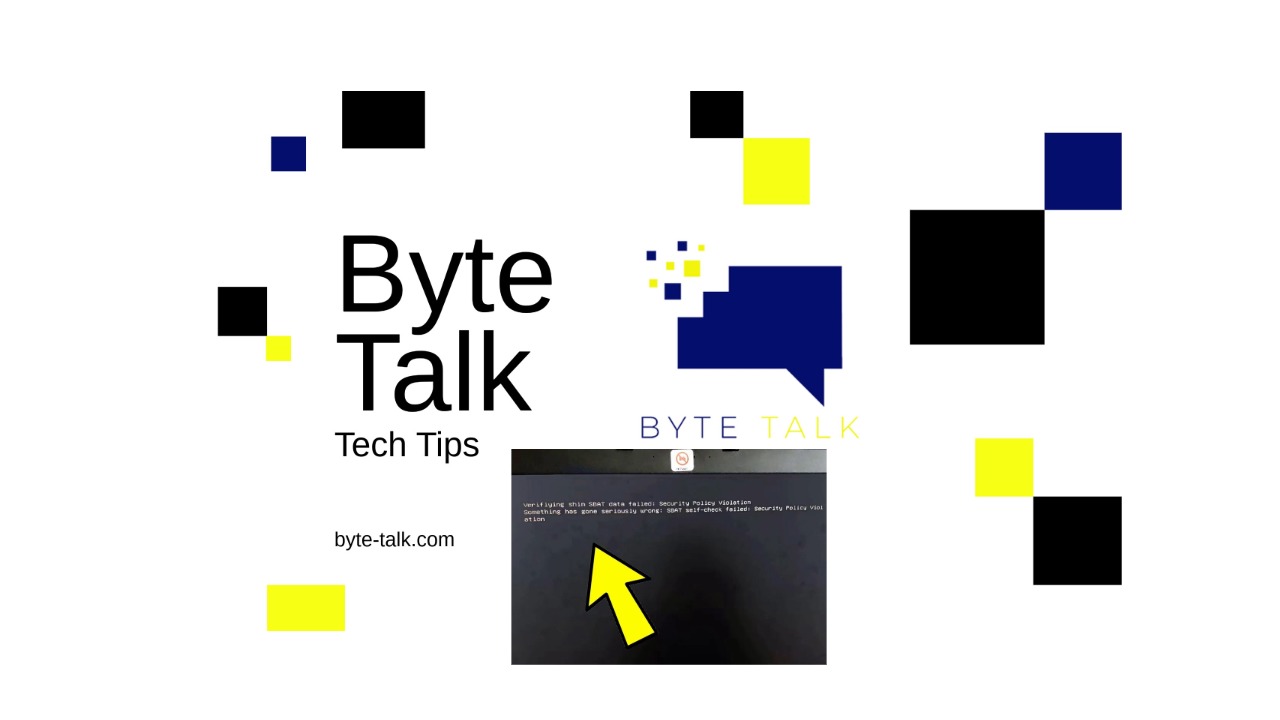
If you’ve ever tried booting from a USB and got hit with the “SBAT Self Check Failed” message, you’re not alone. This frustrating error can pop up when you’re trying to install or repair an operating system — especially Linux or older bootable tools — on a modern UEFI-based system.
The good news? It’s an easy fix. In this guide, we’ll walk you through what causes the SBAT error and how to adjust your BIOS settings to get your USB booting again in just a few minutes.
💡 What Does “SBAT Self Check Failed” Mean?
SBAT stands for Secure Boot Advanced Targeting, a mechanism introduced to make Secure Boot more secure. It checks the digital signatures of your boot files.
If your USB stick uses older boot files or unsigned code, your computer’s Secure Boot will block it, triggering the SBAT Self Check Failed message.
In short — your BIOS thinks your USB isn’t safe to boot from, even if it’s totally fine.
⚙️ Step-by-Step: How to Fix the SBAT Error
Follow these steps to fix the issue quickly:
1️⃣ Enter Your BIOS or UEFI Setup
Restart your computer and press the BIOS key during startup — usually F2, Del, or Esc.
You’ll know you’re in the right place when you see your system’s firmware setup screen.
2️⃣ Disable Secure Boot
In your BIOS menu, head to the Boot or Security tab.
Find the Secure Boot setting and change it to Disabled.
This allows your computer to boot from USB devices that aren’t signed with Secure Boot certificates — which is usually the cause of the SBAT error.
3️⃣ Enable Legacy Boot or CSM (if available)
If your BIOS has an option for Legacy Boot or CSM (Compatibility Support Module), enable it.
This tells your system to allow booting from older devices or media created with Legacy BIOS instead of UEFI.
4️⃣ Adjust the Boot Order
Make sure your USB drive is listed first in the Boot Order or Boot Priority list.
This ensures your system actually attempts to boot from the USB before anything else.
5️⃣ Save and Exit
Press F10 (or follow the on-screen prompt) to Save and Exit.
Your system will reboot — and if everything’s set correctly, you should now boot straight into your USB installer or recovery tool.
🧩 Bonus Tip: Recreate Your USB Boot Media
If the error still appears, try recreating your USB boot drive using tools like Rufus or Balena Etcher, and make sure to select the right boot type — UEFI or Legacy BIOS — depending on your system settings.
✅ Final Thoughts
The SBAT Self Check Failed error can look intimidating, but it’s really just your BIOS doing its job — maybe a little too well.
By disabling Secure Boot and switching to the correct boot mode, you can get past this roadblock and continue your install or repair process.
If you prefer a visual walkthrough, check out our full video guide on YouTube below 👇
🎥 Watch the video: